

How To Edit Smudge Painting Art In Photoshop By VinodSavaleEditz

With your duplicated layer selected, go to Image, then choose Auto Tone. This will automatically adjust the image tone. Now, with your layer selected, go to Filter, then Choose Oil Paint. In some Photoshop versions, you may find the Oil Paint filter, under Stylize menu. After opening the Oil Paint window.
Change Stylization to 5, Cleanliness to 2, and Change Scale to 0.1. and keep all other values 0. These values should vary, depending on your image details. Then click OK. Now, we have a little smooth paint effect. Now, go to Filter, Sharpen, and choose Smart Sharpen. Change Remove to Gaussian Blur, change amount to 50%, and Radius to 1 Pixel. This will sharpen our image a little bit. and remove some blurriness from it.
Again, with your layer selected, Go to Filter, then choose, Filter Gallery. Under Distort folder, choose the Diffuse Glow filter. This filter will add some glow, to the highlights areas in your image. Graininess adds noise to your image. I will keep it 1. and change Glow Amount to 4 or 5. Also, change Clear Amount above 17. All these values should depend on your Image contrast. Then click OK. Now, Double-click your layer's name to change it. After that, Press CTRL+J to Duplicate it. Rename it, Sharp.
Now, with your layer selected, go to Filter, Sharpen, and choose Smart Sharpen. Keep Value 50%, Radius 1 Pixel, and Remove Gaussian Blur. Then click OK. Now, go to Filter, Sharpen, and choose Unsharp Mask. Keep Amount 40%, Radius 4.5 Pixels, and Threshold 0. Then click OK. Now, it's sharper than before. Now, Duplicate the "Sharp" layer, with CTRL+J. Rename it "High Pass". Change Blend Mode to Overlay. Then, go to High Pass filter. Change Radius between 1 to 2 Pixels. This will add some more sharpening to your final result. Quick Note, High Pass + Overlay, always add sharpness to your image. Again, select the "Sharp" layer, then press CTRL+J to duplicate it.
With your duplicated layer selected, go to Image, Adjustments, then Choose Desaturate. Now, From Adjustments again, Choose Invert. After that, Go to Filter, Blur, and choose Gaussian Blur. Change Radius to 5 pixels. Then click OK. Hide "High Pass" layer, to see what's going on. Now, change blend mode to Overlay. This should add a tone like this, to your image.
Now, Change opacity to control the tone density. For a better result, please decrease Opacity to 30%. Let's see! That's Great! Now, change name to "Skin Tone". and make "High pass" layer visible. For a less sharp result, You can decrease the "High pass" layer's Opacity. Also, For a very smooth result, you can decrease the "Sharp" layer's Opacity. Now, Select the First layer, then hold SHIFT, and select the last layer, to select them all. Now, drag and drop on the group icon. Name it "Effect". Now, Let's add some adjustment layers.
Select the group, then go and make a Levels layer above it. Adjust levels depending on your image. Keep moving the sliders, until you get a good result. Now, make a Color Balance layer. You can change the image tone, from these sliders as you can see. Switch to Shadows, and keep testing. All these values should vary, depending on your image and your needs.
Now, change to Highlights. That's it. Let's see the difference. That's Great. Now, add a Vibrance Layer. Change Vibrance and Saturation, to whatever you like. Finally, Add Color Lookup layer. Change it to 3Strip. Decrease Opacity to below 30%. That's it, Let's see the final result. That's Great! Let's test the same previous technique, with this image. I had made an action for it, it's available in the description below, for our patreon members. after running the action like this. You should make your modifications, through all these layers. After changing the image Levels, Color Balance, and Skin Tone.
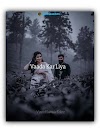
Your final result should be something like this!


0 Comments