


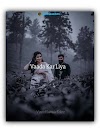
Today I am gonna try turning this image to a silhouette with an evening look using various tools in the free Snapseed app.
First thing I need to remove the backgroundor actually make it completely white.
I will also include the mountains here. To do that, I am gonna use few Selective filters. As the headgear on the fisherman is bit brightwhich may blend into the background, I am gonna darken it. Then couple of Selective filters on thesehills to make them bright. Also adding saturation to make the blues come out.
This will help in making the color completelywhite in the next step. Next to the Black & White filter. Now in the color options, selecting thesecolors make them the brightest. As I need to make the blues more bright, Iam gonna choose that color which would make the background more bright and apply it.
Now to completely turn the background to white,I am gonna use the Curves tool. Dragging the lower part right makes the darkergrayish colors more dark and moving the upper part left makes the brighter grays more bright. Tuning them until I find a nice balance wherethe background is more or less completely white.
Now you can notice some white patches wherethe blacks should be. I need to paint some black here. To do that with the Curves, I am gonna firstdrag this upper point completely to the bottom which turns the image completely black. Then with masking, tap the stacks icon, viewedits, the curves and the brush.
Here with the effect hidden and the brushvalue at 100, just brush over the parts to make them black. If you overdo it, change the brush value tozero and brush out the effect. Also will brush the boat black. There are also some black spots around thehorizon which I need to turn them to white.
So again with Curves, this time I am gonnadrag this lower point towards top which turns the image to white. And with masking, brush on these parts tomake them white. To add a sunset image, I am gonna use DoubleExposure tool and select this image.
The Darken blend mode works pretty well here. Moving the image to a suitable position. Then with masking, I am gonna brush out theimage in the foreground. Next I am gonna add the same image again andmanually rotate it and place it to look like a reflection.
But as you can see, the reflection doesn'tlook mirrored. To correct it, I am gonna open the image separatelyfrom the gallery and export it to Snapseed. Here in the Rotate tool, using the flip optionto flip it. Also rotate it to 180 degrees to make it upsidedown. And save it.
Coming back to the original edit, I am gonnaadd the saved image using Double Exposure. And place it in the foreground to give a mirroreffect. Blend mode to Darken. Then with masking, applying it only on theforeground. Bit of tuning the White Balance to reducethe reddish look and make it more orangish. So here are the changes after each edit.
Thanks for Reading!


0 Comments